


With the recent peak in prices, everything is getting even more expensive than before. Being the social beings that we are, there are some forms of spending we cannot avoid, the biggest being gifts for our loved ones. From birthdays to anniversaries, it all stacks up to a very hefty bill. With that being said, there is a way to avoid breaking bank. Using this guide, you can make very easy, affordable gifts for the special people around you. The winter months, when the days are shorter and the nights are longer, might also be a good time to give these gifts. Imagine how different these chilly mornings make you feel, and how DIY gifts might make it even better.
Here Ye, Here Ye!
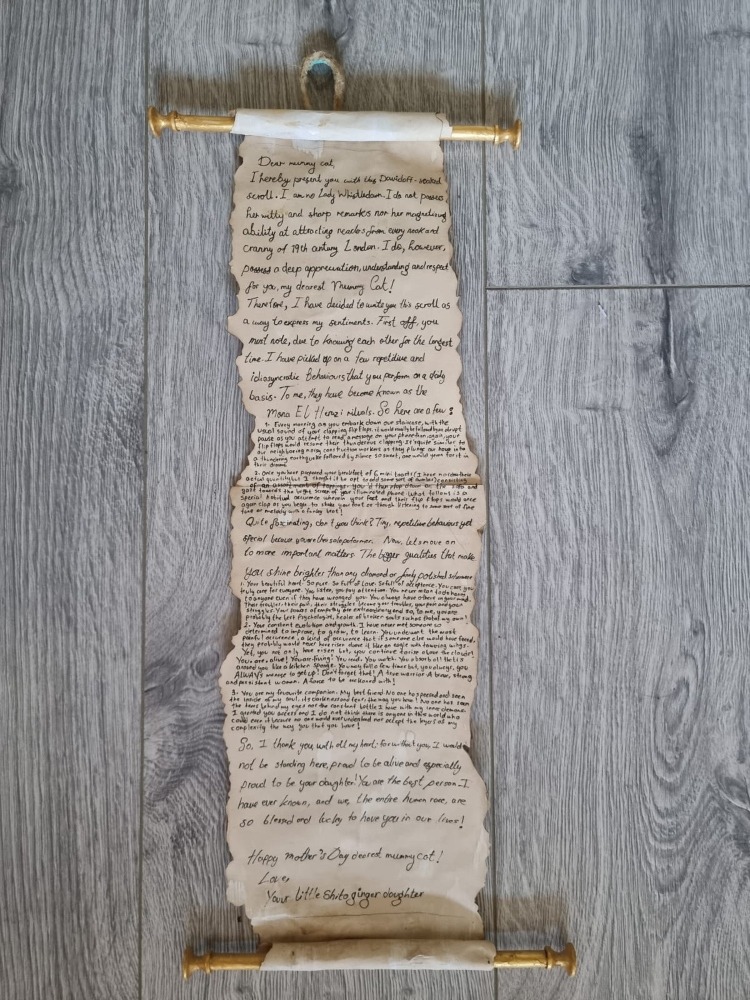
Who doesn’t love the good old days when people used to exchange handwritten letters or collect stamps? If you have a lot of love for someone and want to literally put it down on paper, then bringing back some of these old nostalgic practices is the way to go.
You could take the generic route and write a letter but if you want to go for something more unique, there is the option of creating an old-fashioned scroll. It is extremely easy and quick to make so it will be great if you are also very short on time.
What you need:
- 2 pieces of A4 paper
- Instant coffee
- A lighter/kitchen lighter/ fire from oven burner
- 2 pencils
- 4 pins
- Gold paint (acrylic is recommended)
All the items above can easily be found at home except for the gold paint which you may need to purchase from a nearby art shop or even online. A good option would be to get Daler Rowney’s simple acrylics gold paint from noon.com, costing only 50 LE.
To make the vintage style paper:
You will first get two pieces of A4 paper and tape or glue their ends together to make them longer in length. Then you need to make them thinner in width by cutting out some of the paper lengthwise. Next, to make the paper have that old yellow hue, get whatever instant coffee you have in hand and mix it with some water. Then using a paint brush or even a silicone kitchen brush, cover the entire paper with the coffee until its pale yellow. Wait until the paper dries completely then give it more age by taking a lighter and burning its edges.
To transform it into a scroll, you’ll need to take 2 pins and stick them to each end of the pencil. You should do this for both the pencils. Then paint the pencils with the gold paint to give the impression that they are two golden rods. Finally, glue the top edge of the scroll to one of the pencils and the bottom of the scroll to the other pencil. Then roll it up. With that, you’ll have a vintage scroll.
When it comes to the writing part, you can be a little playful and mimic Bridgeton’s lady Whistledown. Her witty and sassy tone of voice can add a comedic touch to your sentimental gift.
A Jar of Love
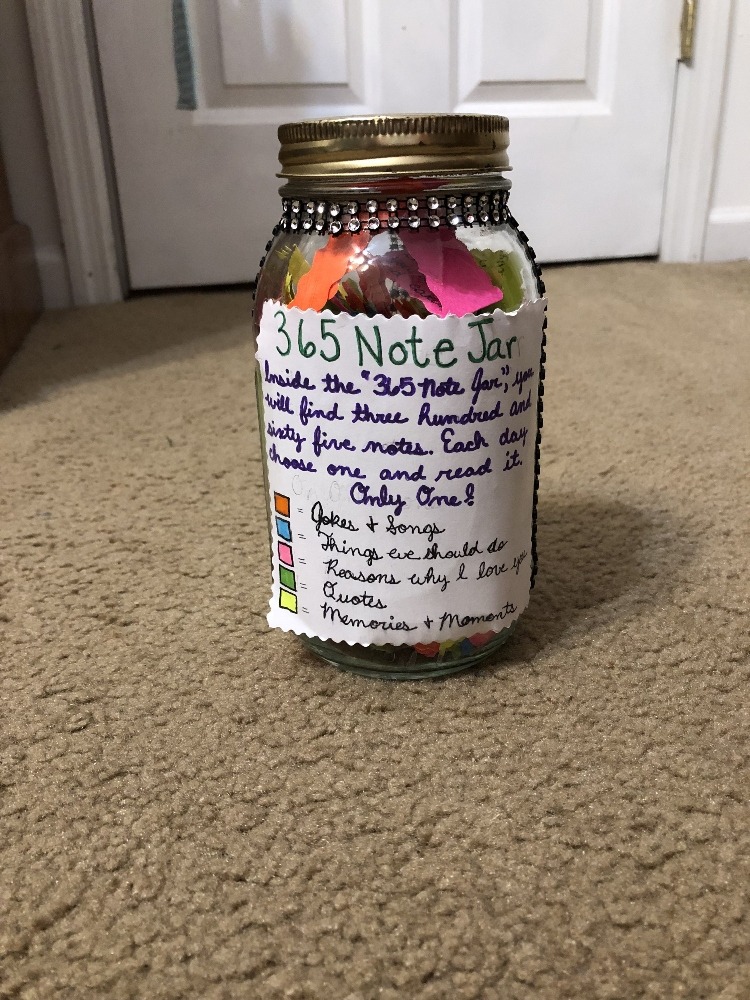
In many ways, we really know our loved ones. We know their secrets, their quirks as well as what makes them tick. To show your love, you can curate what you know and love about them into a list. For example, you can make a list of the 50 reasons why that person is awesome.
To make it even more personal, you can group that list into separate categories. The categories will depend on the person and your relationship to them. If for example they are your co-worker, one of the categories can be a list of all the reasons why they are awesome as a co-worker. Some of the reasons might include that they love to share their lunch with you or help you out when you get stuck with a task. Another category can be “reasons why they are awesome as a human being”. In this category, you can focus on moments when they were kind to you.
Once you made your list, you will then need a glass jar with a lid. You might already have one or you can purchase one online from noon for 60 L.E. There are cheaper options at Nozha El Gedida. With the glass jar ready, you will then need to write down each item from the list on a colored square paper. You can easily get some A4 paper, cut them into the post-it notes size squares then color them in using colored pencils or markers. You should make sure to use a different colored paper for each category. For example, for the co-worker category, you can use green square papers, for the human being category, you can use yellow square papers, and so on. Finally, you can stick a piece of paper to the front of your mason jar to act as your key. For each category, add its equivalent colored square next to it like the image above.
You can make the list of reasons as long as you want. It’s all up to you. The beauty of it is that the more reasons you add, the more days they will have to enjoy the gift. Reading each note will bring a lot of joy to that person’s life.
12 Day Celebration
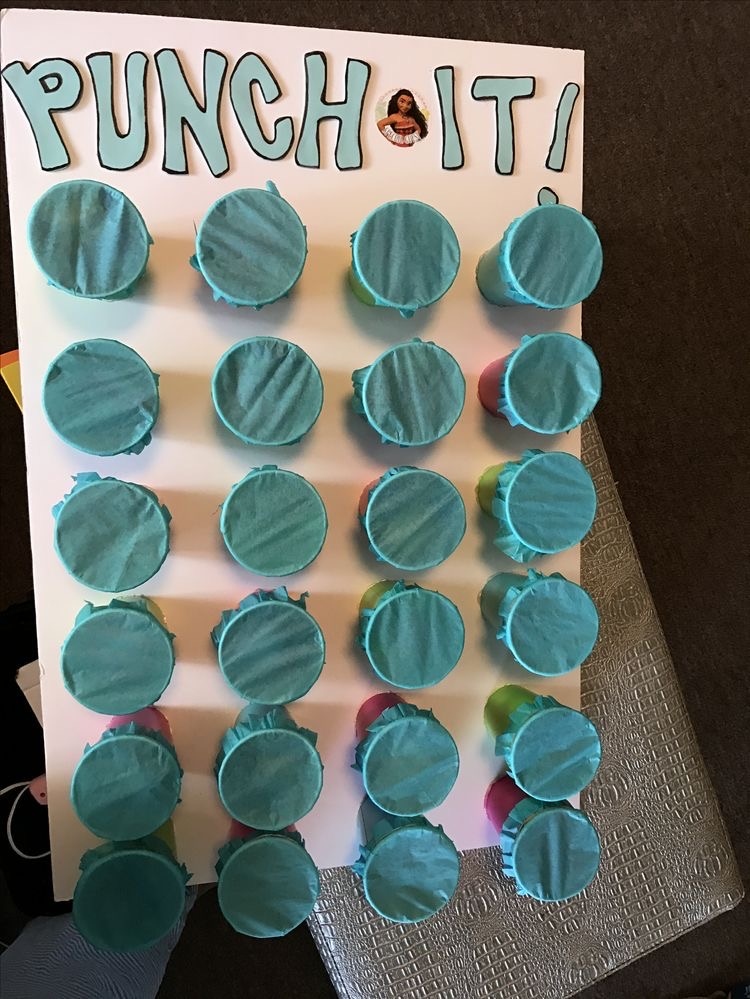
For some people, one day of celebration is not enough. Week-long or even month-long celebrations are the expected dose. If this describes a friend or loved one whose birthday is coming up, then this will be the perfect gift.
Using a big cardboard box or a large foam poster; you can make a 12-day surprise punch box. This consists of a cardboard box covered with 12 plastic cups. The idea is that the receiver of the gift will get 12 gifts in 12 days. Everyday, they will punch one of the 12 holes and receive their surprise gift until the 12 days are over.
Here’s what you’ll need to make it:
- Large cardboard box
- 12 round plastic takeaway bowls
- Colored tissue paper
You will stick each cup onto the cardboard box, leaving good space between each so that they cover the entire box. Then you will cover each paper cup with a colored tissue paper. You will need to label each cup with a number from 1 to 12. You can use a black board marker or a pen.
With the punch box ready, you’ll need to buy the gifts. I would recommend keeping it simple and going for small items that you know they already love to use or would want to buy. For example, you can buy them their favorite blend of coffee or herbs like Ahmed Tea’s Peach and Passion fruit flavored tea. They can be easily found at the nearest supermarket or using any of the online store apps. Once you bought all 12 items, you can then wrap them in any wrapping paper of your choosing. Then make sure to label each gift with a number from 1 to 12 so that when the person would punch each cup, they would receive the relevant gift
Resin acrylic paint Christmas Tree Ornaments DIY
These resin acrylic paint Christmas tree ornaments are stunning and especially colorful, plus they add a dream catcher/stain glass quality to the Christmas decorations. Additionally, they are easy to make and are great for resin beginners to experts. You can even get to replicate the beach on an ornament with shades of blue and brown!

Here are the supplies you’ll need for resin acrylic paint ornaments:
- EasyCast Clear Casting Epoxy
- Cabinet Knob Molds
- Mold Release Conditioner Spray
- Silicone Coaster Molds
- Acrylic Paint
- Mixing Cups
- Stirring Sticks
- Drill with Bit
- Twine
- Scissors
DIY Flower Wall
This succulent wall is the ideal way to display your prized potted plants! This beautifully showcases the aesthetic behind greenery and how it can be utilized as a gift. Not a lot of people take advantage of plants when thinking about gifts and we’re here to change that.
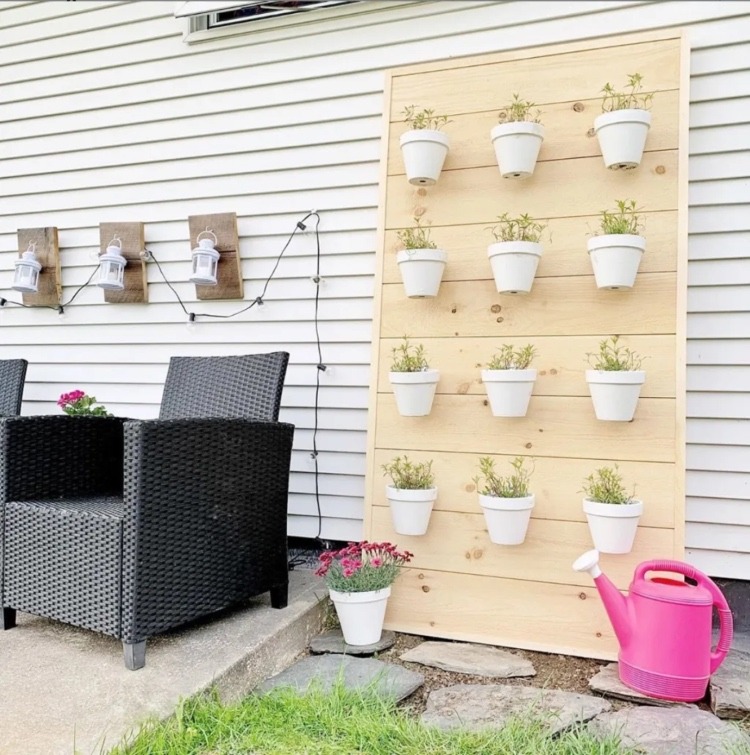
Here’s what you’ll need to make this:
- Shiplap boards (5)
- Terra-cotta pots (12)
- White spray paint (2)
- Hanging pot clips (12)
Next time you’re thinking about buying a gift, think again as this guide offers you the best ideas for DIY gifts. They’re easy to craft and will save your budget for sure. Plus, putting effort into gifts is the one thing that makes them even more special.
WE SAID THIS: Don’t miss DIY: Valentine’s Day Gifts For The Woman Who Owns Your Heart